How to read Japanese mechanical drawings (JIS)
Not everyone can understand deeply and read Japanese mechanical drawings properly. So how to read the drawing properly? Let’s learn with me how to read Japanese mechanical drawings in the article below.
What is the JIS standard?
JIS Standard (English: Japanese Industrial Standards) is a Japanese industrial standard used in industrial activities in this country.
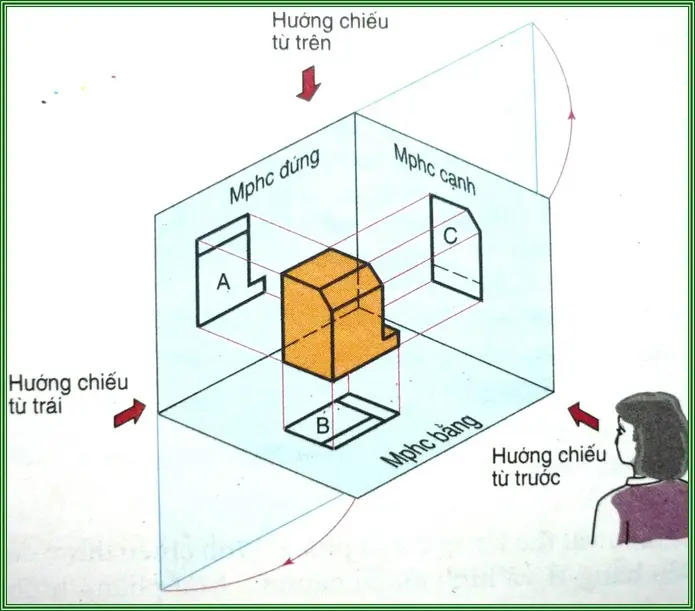
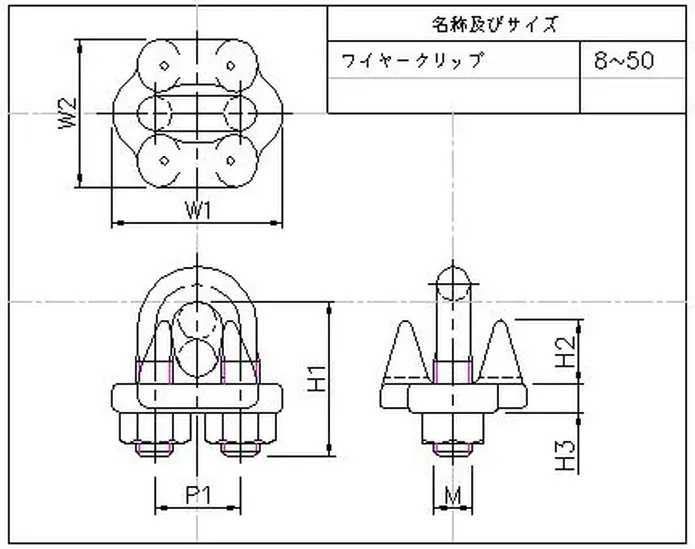
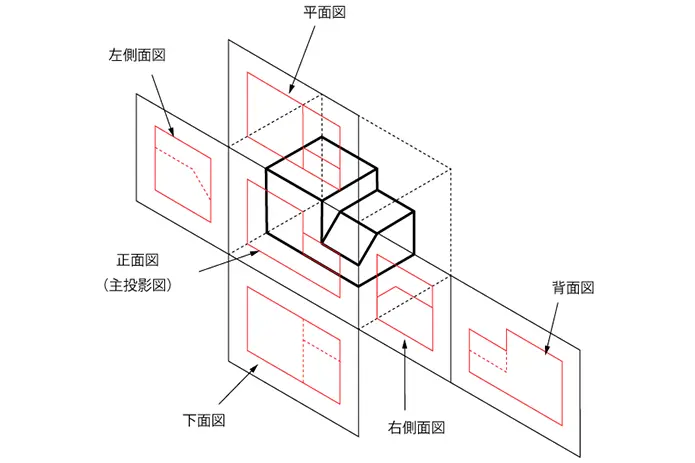
Unlike drawings in Vietnam, Japanese drawings have an edge-to-vertical projection layout and are used according to JIS standards – the 3rd angle projection method (illustration). In addition, when the processing details are complicated to clearly show the requirements to be processed, people will use cutting drawings and extract drawings.
Instructions on how to read Japanese mechanical drawings (JIS)
To understand how to layout and build projections according to JIS standards, please follow the reading below.
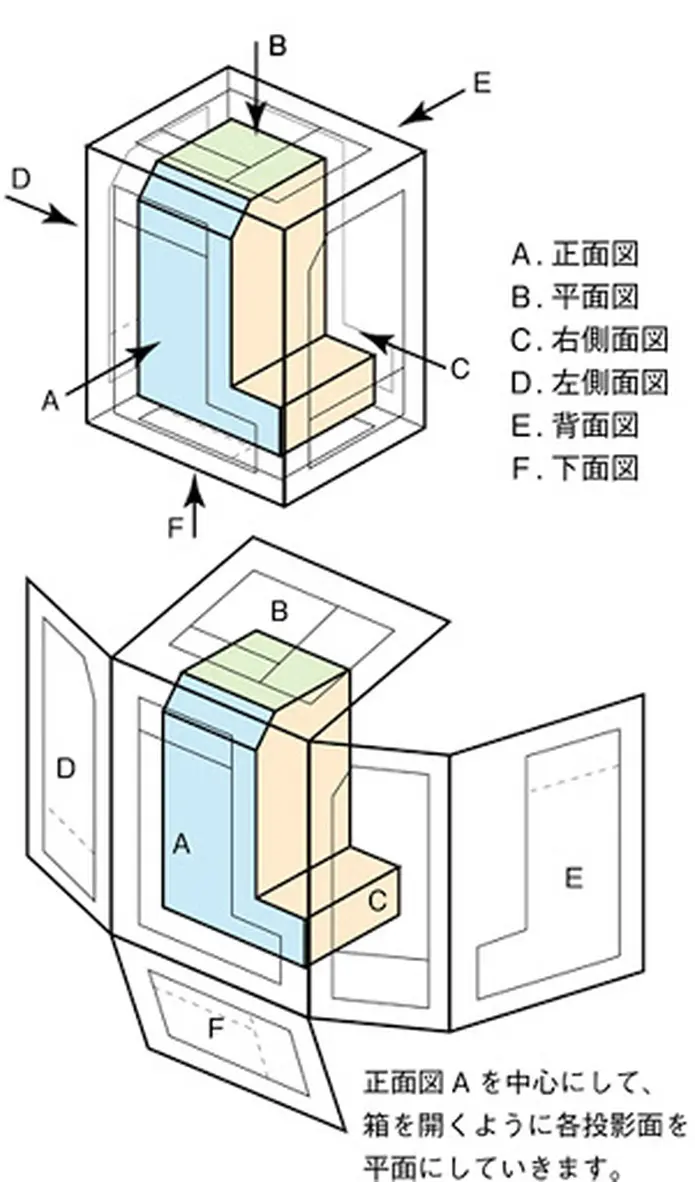
Suppose when there is a rectangular box with the symbol planes in the figure:
- Looking from the outside, you will see the object passing through the planes and showing the faces of the rectangular box with the corresponding lines (visible or hidden).
- If you open the planes of the box (shown below) you will get the corresponding projections of the object on the respective faces.
- The planes of the box that are spread on the same plane will be the projection planes of the object.
As a result, each object will have 6 corresponding planes, but usually only 3 faces are enough. If it’s simple, it’s 2 projections, while it’s complicated, it takes up to 6 faces to be projected and the cut and extracted images to show all the objects. In which, the projection always has the main view to be able to see the whole object.
Draw projection from bright object 2D model
In addition to applying the above standard, you also have to know how to imagine the object to be able to draw accurately and quickly.
– From the object, you will draw the following 2D projections:
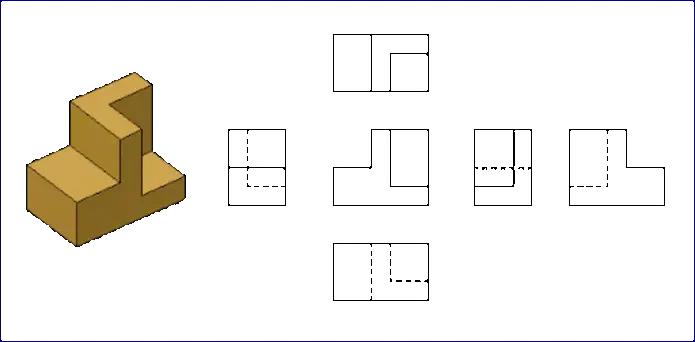
– You will draw and arrange the corresponding projections as above.
When drawing, you must draw the faces that show the most clearly and easily visualize the object. At the same time, limit the dashed directions and the number of projections just enough to visualize the object.
From the projection of 2D models to build real objects
In order to build a real body from a 2D view, technicians need to master the rules of viewing the image above.
From 2D drawings to build objects, you must visualize 3D objects. This is the ultimate goal of reading engineering drawings.
– From the 2D projection, build the object as follows:
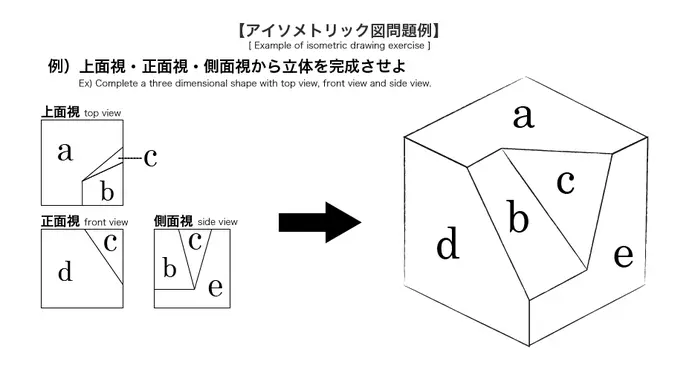
When starting to edit, you should sketch the object from the projection so that the image uses the object. Then, based on the remaining shapes to build the next object, you can cut or add blocks.
Reference source: blog.mecsu.vn
-
CNC MILLING LATE MACHINING
Price: ContactWith milling and lathe, we can precisely machine complex, multi-tasking parts that require a combination of milling and turning.
IDEA’s precision machining products have many varieties and diverse, meeting the needs of even the most fastidious customers. Our machines are imported from leading Japanese brands such as Mori Seiki, Makino, OKK, DMG CNC and multi-function machines, up to 120 types of machines suitable for all stages of mechanical processing.
-
DEFECT INSPECTION MACHINE
Price: ContactDefects are also a serious error, which must be eliminated promptly before moving on to the next stage or before reaching the consumer. The machine is capable of automatically inspection for defects on products by applying modern image processing technology, ensuring high accuracy.
All of these devices are designed in 3D, optimally simulating movements before manufacturing to ensure accuracy and reliable operation.
-
6 AXIS ROBOT
Price: ContactThe 6 axis robot has a compact and flexible arm suitable for operations such as pick-and-place, precision assembly, parts transportation, and welding. The robot is light in weight and small in size, so it can be placed inside the processing machine, hung on high, and can work in narrow environments.
-
AUTOMATIC DEBURRING MACHINE
Price: ContactThe automatic bavia machine is widely used in production factories, is an important equipment to improve the efficiency of production activities, whose performance is superior to manual labor.
-
IMPURITY INSPECTION MACHINE
Price: ContactIf impurities exist or penetrate into products, it will cause great harm to manufacturers, especially in the field of food, drink and also in equipment and products requiring high safety. The machine is capable of automatically inspect different types of impurities, depending on the requirements of the customers.
All of these devices are designed in 3D, optimally simulating movements before manufacturing to ensure accuracy and reliable operation.
-
3 AXIS ROBOT
Price: Contact3-axis robot, XYZ robot is a specialized robot with high precision and speed, applied in the industry of manufacturing and assembling electronic components, automobiles and motorcycles such as applying glue to PCB circuits, or applying grease, glue to multi-point positions, difficult to manipulate, complex profiles on motorcycle gearboxes, circuit boards.
-
AUTOMATED GUIDED VEHICLES IGR – STA
Price: ContactAutomated Guided Vehicles IGR – STA is a very compact AGV for towing or carrying solutions.With simple modern design, this AGV will meet all of your expectations for various application with most reasonable cost.
-
PROFILE INSPECTION MACHINE
Price: ContactThe machine has the ability to automatically inspect all kinds of profiles, deformations, defects of the product caused by previous stages. The system is integrated by modern sensors and cameras to help detect errors immediately, prevent efflux and immediately prevent mass waste that can cause great losses to manufacturers.
All of these devices are designed in 3D, optimally simulating movements before manufacturing to ensure accuracy and reliable operation.


